Bringing a new product to market often stalls at one critical step — getting small batches of parts that match production quality. Traditional injection molds take 8–12 weeks to build and cost thousands of dollars, which is difficult to justify when you only need a few dozen parts for testing or a pilot run.
Vacuum casting solves this problem by using silicone molds and polyurethane resins to replicate parts quickly and economically. Typical projects deliver 10–50 parts in 7–10 days, with surface finish and dimensional accuracy close to injection molding.
This guide explains what vacuum casting is, how the process works, its advantages and limitations, and when it makes sense to choose it over 3D printing or injection molding.
What is Vacuum Casting?
Vacuum casting — also called urethane casting — is a manufacturing process that uses a silicone mold and polyurethane resin to produce small batches of plastic-like parts. A master model is created first, then encased in silicone to form a mold. Under vacuum, liquid resin fills the mold cavity, eliminating bubbles and ensuring smooth, accurate parts.
Unlike traditional injection molding, vacuum casting requires no steel tooling, which drastically reduces upfront cost and lead time. It is best suited for low-volume production runs (10–50 parts per mold), design validation, and market testing where speed and appearance are critical.
In short, vacuum casting gives you a cost-effective way to obtain production-quality parts quickly — without committing to full-scale tooling.
How Vacuum Casting Works
The process begins with a master model, typically made by CNC machining or high-resolution 3D printing. Because every detail on this model will be transferred to the final parts, its dimensional accuracy and surface finish are critical.
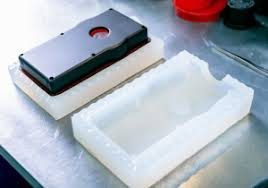
Once the master is complete, it is placed in a casting frame and surrounded by liquid silicone. After curing, the silicone is cut open to remove the master, leaving a flexible mold cavity that can capture even fine surface textures.
Next comes the casting stage. Polyurethane resin is mixed — often with color pigments — and placed under vacuum to remove trapped air. This step is crucial, as it eliminates bubbles that would otherwise cause voids or surface defects. The resin is then poured into the silicone mold and allowed to cure under controlled conditions.
After curing, the mold is carefully opened, and the parts are removed, trimmed, and post-processed. Depending on requirements, finishing steps may include polishing, painting, or texturing. Each part is inspected to ensure it meets dimensional and aesthetic requirements before delivery.
Advantages of Vacuum Casting
Vacuum casting remains one of the most popular choices for engineers when speed and appearance are critical. Here’s why it works so well for prototyping and low-volume production:
1. Faster Lead Times
With vacuum casting, you can typically get first articles in 7–10 days, compared to 8–12 weeks for traditional injection molds. This means you can validate design changes and keep development milestones on track instead of waiting months.
For example, a consumer electronics startup we worked with produced 30 enclosure sets within two weeks, allowing them to run a full pilot build and catch assembly issues before investing in mass production tooling.
2. Lower Tooling Cost
Silicone molds are inexpensive and quick to make — usually taking just 1–2 days to build. This makes vacuum casting the most economical choice for 10–50 parts per mold, especially when you expect design iterations.
Instead of spending thousands on a steel mold, you can afford to run multiple design versions side by side, compare them in real-world tests, and choose the best-performing design with minimal sunk cost.
3. Production-Grade Finish
The process captures fine surface details from the master model, giving you smooth, accurate parts that look nearly identical to injection-molded components.
This is crucial when appearance matters — think automotive interior trims, medical device housings, or trade show display parts where surface quality influences stakeholder confidence. These parts can also be painted, textured, or plated to replicate the final product finish.
4. Wide Material Selection
Vacuum casting supports a broad range of polyurethane resins: ABS-like for strength and stiffness, PP-like for flexibility and chemical resistance, clear grades for optical parts, and rubber-like urethanes with Shore A hardness from 40 to 90.
This flexibility lets you run functional tests under real conditions — snap fits, thermal cycling, even drop tests — to confirm that your part performs as intended before committing to mass production.
Limitations and When Not to Use Vacuum Casting
Vacuum casting is a great solution for prototypes and low-volume runs, but it does have its limits. Understanding where it falls short helps you avoid surprises later.
- Limited Mold Life: Each silicone mold typically lasts 15–20 shots before losing accuracy or tearing. If you need hundreds or thousands of parts, the cost of making multiple molds will add up — at that point, investing in aluminum or steel tooling for injection molding becomes more economical.
- Material Performance: While polyurethane parts can mimic ABS, PP, and other plastics closely, they are not identical. Long-term UV resistance, chemical compatibility, and mechanical durability are usually lower than that of injection-molded thermoplastics. For example, a vacuum-cast housing might be fine for a prototype run but could yellow or become brittle over time in outdoor use.
- Tight Tolerances and Complex Geometry: Vacuum casting can achieve ±0.2 mm tolerance for most parts, but extremely tight fits, thin walls, or complex undercuts can be challenging. Designs with multiple snap features or intricate sealing surfaces may need adjustment to ensure repeatable quality.
When to Switch to Injection Molding
Vacuum casting is ideal in the early stages — when you’re still refining the design, collecting feedback, and building small batches. But once your design is finalized and demand begins to grow, the economics shift.
A good rule of thumb is that when your production volume exceeds 100–200 units, the cost per part from vacuum casting starts to rise compared to injection molding. Each silicone mold only produces 15–20 good shots, so you would need to make and manage several molds in parallel. This increases lead time and adds labor for trimming and finishing.
Injection molding, on the other hand, allows you to produce hundreds or thousands of identical parts with a single tool. The upfront investment is higher, but the cost per piece drops significantly once you reach a few hundred parts — and you gain superior repeatability, material options, and surface durability.
For example, a medical device manufacturer might start with vacuum casting for its first 50 housings to run usability studies and regulatory tests. Once the design passes validation, moving to injection molding ensures every subsequent part meets the same quality standard for years of production.
Material Options & Surface Finishes

Material Options for Vacuum Casting
One of the key strengths of vacuum casting is the flexibility in material selection. Polyurethane resins can be formulated to mimic the properties of many production plastics, allowing you to test both appearance and performance before investing in steel tooling.
| Material Type | Key Properties | Typical Applications |
| ABS-like Urethane | Rigid, good impact strength, easy to machine and paint | Enclosures, housings, structural prototypes |
| PP-like Urethane | Flexible, excellent chemical resistance, supports snap fits | Living hinges, clips, fluid-handling parts |
| Transparent Urethane | High optical clarity, polishable, tintable | Light covers, display windows, lenses |
| Rubber-like Urethane | Shore A hardness from 40–90, good elasticity | Gaskets, seals, soft-touch components |
| High-Temperature Urethane | Heat deflection up to 120–150 °C | Under-hood components, thermal stress testing |
With these material options, you can replicate the mechanical behavior of production parts closely enough to run assembly checks, mechanical stress tests, or market demos with confidence.
Surface Finishes for Vacuum-Cast Parts

Vacuum casting also allows you to achieve a wide range of cosmetic finishes. Because the silicone mold captures every detail of the master model, the surface finish is determined by how well the master is prepared.
Common finishing options include:
- Matte or Glossy Finish: Control the visual appearance to match production intent
- Painting or Custom Coloring: Achieve brand-specific colors or soft-touch coatings
- Texturing: Apply MT or SPI standard textures to simulate molded parts
- Plating or Coating: Add decorative metallic finishes or EMI shielding layers
Early communication of cosmetic requirements is critical. If you need a specific gloss level, texture, or color, it’s best to define this before the master model is made. This minimizes rework and ensures that your prototype accurately represents the final product.
Typical Applications
Appearance Prototypes
Vacuum casting is often the go-to choice when appearance is under scrutiny. Because the silicone mold captures even the smallest surface details, you can create parts that look almost indistinguishable from injection-molded components. This is critical during design reviews or executive sign-offs, where decision-makers want to see a product that feels “real.”
For example, an automotive supplier used vacuum-cast dashboard components with painted finishes for a concept car presentation. The realistic look and feel helped secure management approval and move the project into production tooling.

Functional Testing
Design validation isn’t just about looks — it’s about proving that the part works as intended. Vacuum casting allows you to use ABS-like, PP-like, or rubber-like urethanes to mimic production material properties. This lets engineers check snap fits, assembly torque, vibration resistance, and thermal behavior.
A medical device manufacturer vacuum-cast 40 housing sets to run sterilization and drop tests, catching a stress concentration issue early and avoiding a costly tooling modification later.
Bridge Production and Pilot Runs
When you’re waiting for steel molds but can’t pause your schedule, vacuum casting fills the gap. Each silicone mold can produce 15–20 good parts, and multiple molds can run in parallel to hit higher quantities. This allows you to build pilot assemblies, fine-tune your assembly line, and train operators before mass production starts.
A consumer electronics brand produced 200 vacuum-cast units to run a full pilot build, validate packaging and logistics, and collect assembly yield data while waiting for their multi-cavity tool.
Market Testing and Early Launch
Getting real-world feedback early can save you from costly design mistakes. Vacuum casting lets you produce short runs (10–50 parts per mold) for beta programs or limited market launches.
A hardware startup shipped a small batch of vacuum-cast wearable devices to early adopters and used the feedback to tweak strap design and button placement before cutting final molds — avoiding a six-figure tooling change.
Cost and Lead Time Expectations
One of the main reasons engineers choose vacuum casting is its predictable schedule and relatively low upfront cost. A typical project takes 7–10 business days from receiving your 3D CAD files to delivering the first set of parts. This includes master model fabrication, silicone mold production, casting, curing, and basic finishing. If you need multiple molds or extensive post-processing like painting or plating, add a few extra days.
Cost is driven by several key factors:
- Number of Molds Required: Each silicone mold yields around 15–20 good shots. If you need 100 parts, expect several molds to be made and run in parallel.
- Part Geometry and Size: Complex undercuts, deep cores, or large volumes require more silicone and longer setup, increasing mold cost.
- Material Selection: Standard ABS-like urethane is the most economical, while high-temp or transparent grades can add material cost.
- Surface Finish and Post-Processing: Polished, painted, or textured parts require more manual work and increase per-part pricing.
For best results, run a DFM (Design for Manufacturability) review early. Small changes like adding proper draft angles, keeping wall thickness uniform, or simplifying parting lines can reduce the number of molds needed, cut cycle time, and lower scrap risk — saving both time and money over the entire project.
Vacuum Casting vs. Other Manufacturing Methods
Choosing the right process depends on your timeline, budget, and production volume. Here’s how vacuum casting compares with other common manufacturing methods:
| Process | Upfront Cost | Lead Time | Material Options | Surface Finish | Typical Volume |
| Vacuum Casting | Low | 7–10 days | Polyurethane resins (ABS-like, PP-like, clear, rubber-like) | Near production quality | 10–50 parts per mold |
| 3D Printing | Very Low | 1–3 days | Limited polymers & resins | Layered, rougher surface | 1–10 parts |
| Injection Molding | High | 8–12 weeks | Full range of thermoplastics | Production-grade finish | 500+ parts |
Vacuum casting sits in the middle ground — faster and cheaper than injection molding, but producing parts with much better appearance and mechanical properties than most 3D printing methods. It’s the ideal choice when you need realistic parts quickly but aren’t ready to commit to mass production tooling.
Quality and Documentation
Vacuum-cast parts aren’t just quick to produce — they are inspected and documented to meet your project’s quality requirements. A well-controlled process ensures every batch is consistent and traceable.
We can provide First Article Inspection (FAI) reports and dimensional inspection summaries, allowing you to verify that critical features meet your specifications before moving forward. For projects with regulatory requirements, we can also supply RoHS, REACH, and material compliance certificates, giving you confidence that your parts meet environmental and safety standards.
Process consistency is monitored throughout production. Each mold is tracked for shot count, and visual checks are performed to detect wear before it impacts part quality. For high-criticality projects, we can retain reference samples from each batch, a practice commonly used in automotive and medical prototyping to ensure traceability.
This level of documentation means you don’t just receive parts — you receive the data and validation necessary to de-risk your transition to full production tooling.
How to Get Started with Vacuum Casting Factory
Getting started with vacuum casting is straightforward. Here’s what you need to prepare:
- Share Your Design Files: Upload your 3D CAD files (STEP, IGES, or STL), along with quantity requirements and any special material or finish preferences.
- Receive DFM Feedback and Quote: Our engineering team reviews your design and provides a detailed quotation, plus design-for-manufacturability feedback, typically within 24 hours. This helps catch potential issues — like wall thickness or draft angle problems — before production begins.
- Approve and Kick Off Production: Once you approve the quote, we start building the master model and silicone mold immediately, keeping you updated on progress until parts are ready.
- Review Parts and Plan Next Steps: After delivery, you can inspect the parts, run tests, and decide whether to move into additional iterations or full production tooling.
Ready to start? Request a Quote for Vacuum Casting and get your first parts in as little as 7–10 days.
Conclusion
Vacuum casting remains one of the most practical ways to bridge the gap between concept and production. It combines fast lead times, low tooling cost, and near-production quality, making it ideal for prototypes, pilot builds, and early market launches.
If your goal is to validate your design, gather real-world feedback, or deliver short-run parts without waiting months for steel tooling, vacuum casting is a proven solution.
Take the next step — request a quote or send us your CAD files for DFM feedback.
FAQs about Vacuum Casting
How many parts can be produced from one silicone mold?
A typical silicone mold yields about 15–20 parts before the material begins to lose dimensional accuracy or tear. The exact number depends on the part’s size, geometry, and surface finish requirements. For larger runs, multiple molds can be made and run in parallel to meet your quantity and schedule.
Can vacuum casting produce clear or tinted parts?
Yes — vacuum casting can produce fully transparent or tinted parts by using clear polyurethane resins. After casting, parts can be polished to improve optical clarity or tinted in various colors to match your design needs. This makes it ideal for light covers, display windows, and other components where visual appearance is critical.
What dimensional accuracy can I expect?
Vacuum-cast parts typically achieve ±0.2 mm dimensional accuracy for most geometries. Larger parts, uneven wall thickness, or complex undercuts can introduce more variation. For critical dimensions, we recommend a DFM review before mold making to ensure your design can meet the required tolerances.
Can I specify custom colors or textures?
Yes. One of the advantages of vacuum casting is its ability to closely match the appearance of your final product. We can tint the polyurethane resin to almost any custom color — using RAL, Pantone, or supplied color samples as a reference. For surface finish, we can replicate textures from the master model, including matte, gloss, or fine texture patterns.
If your project requires consistent color matching across multiple parts, we recommend producing a small batch first for approval. This allows you to confirm color accuracy and surface feel before we proceed with the full order.
How strong are vacuum-cast parts compared to injection-molded parts?
Vacuum-cast parts are generally very durable and suitable for functional testing, but they are not as strong as injection-molded parts made with production-grade thermoplastics. The polyurethane resins used in vacuum casting can closely mimic ABS, PP, or rubber-like materials in terms of appearance and flexibility, making them ideal for prototypes and low-volume end-use parts.
However, their mechanical strength and long-term performance may be lower — especially under continuous load, high heat, or harsh chemical exposure. If your application involves demanding mechanical or environmental conditions, vacuum casting is best used for short runs, validation builds, or pre-production testing before moving to injection molding.
